Thursday, February 15, 2018

ConieFong Susie Sunshine


Hello, welcome back and who would of thought I will do a back to back posting lol!
Well I'm really trying to keep up with my blog.
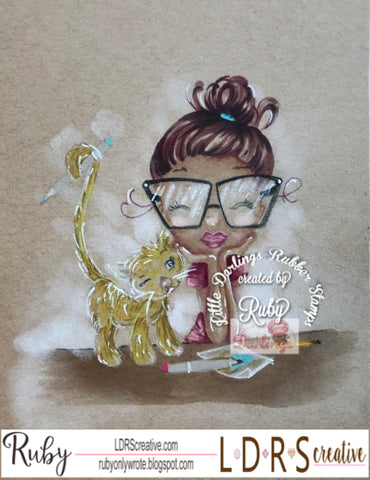
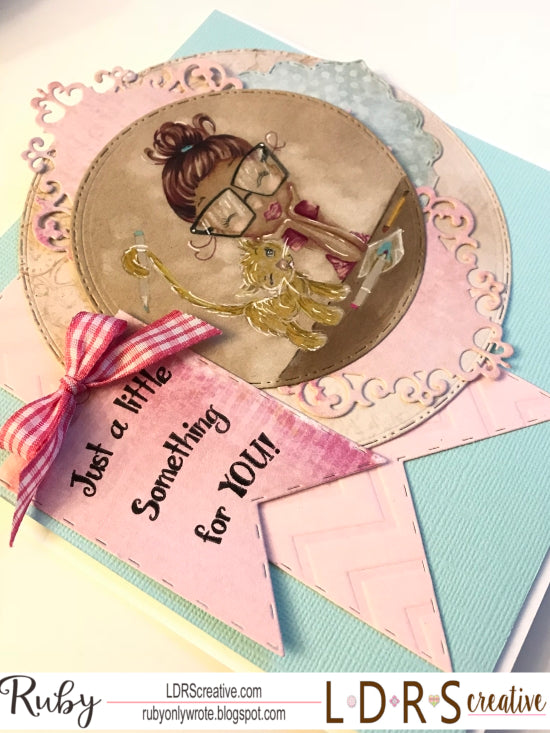
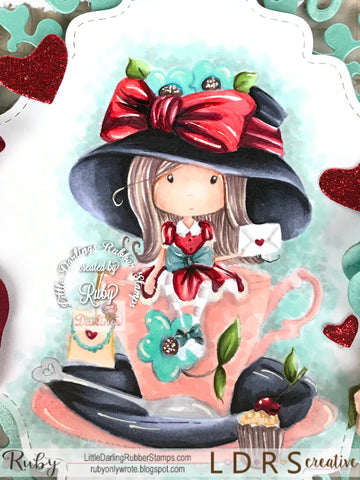
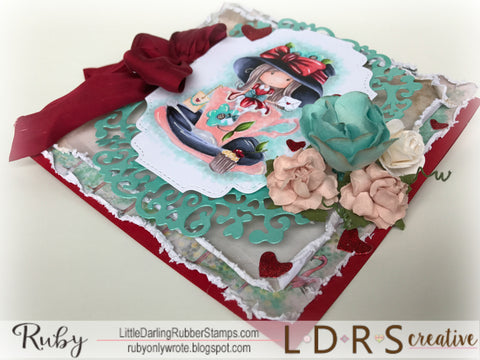
Anywhoo, I have a ConiFong image today and this one is name Susie Sunshine.
 I  played with some Maja Design paper from the Summertime collection. I thought she coordinated very nicely with it. 
I layered a few Creative basic die cuts and Creative Basic dies by Rhea.

Keeping it clean and simple.

I watercolored her using Timholtz distress inks, Marvy watercolor markers ,Tombow watercolor makers and Nuvo watercolor pens.
I like to pick different colors from different brands just because some have different tones that I prefer at the moment.
I use Hotpressed watercoloring paper too.


Thank you for stopping in really quick and make sure you pick up your image at the Conie Fong store.
I'm already eyeing a new image to color.


Have a lovely day <3 nbsp="" p="">


Wednesday, February 14, 2018

Love is .... Molly's HeartLine

Hello, my Lovelies and HAPPY Valentine's Day! I really wanted to try my best to come in here and do this post. I have tons of things going on. That's for another day and don't want to get into that since it's the day of Love, peace, and anything that makes you feel happy. 

I have a special showcase today featuring this little girl from Tiddly Inks name  Molly's Heartline Digital Stamp.


  I colored her with my copic markers on Radiance Paper.

and then just fuzzy cut her.
Played with a little molding paste and Faber-Castell Gelatos on my design paper and layered so many pretty cuts to adorn her.


I am Roses is a sponsor of Passionate Paper Creations and Friends. I adore these stunning flowers. The variety of flowers are endless. Thank you, I am Roses. 


Sending lots of love to all my friends and followers on all my social media platforms.
Thank you for stopping by and go pick up your Tiddly Ink digital image :) 


Wednesday, January 17, 2018

Just A Little Something For You


Hello, Welcome back today I'm showcasing this lovely  Saturated Canary Crafty Cat rubber stamp and layering many LDRS dies for a CAS card turnout.


I've been doing a lot of Kraft coloring these days, using my copic markers and pencils.

I stamped Saturated Canary Crafty Cat on cardboard cardstock from Bazzill and the end effect is amazing that gives an amazing pop of color.


I used my Polkadoodles Time for Tea 6x6 Paper pack to cut out these lovely intricate cuts and layer them over each other.
I had an idea of using the sentiment that comes in the ART-Z Penny Peacock stamps and dies set. That collection has so many sweet sentiments and the zentangle images are marvelous.


Kept the card simple and yet still full of depth with the help of the LDRS Dies.
You could find all the products used at the bottom of the post directing you directly to the item.

My next posts coming up soon will be CHA (I still call it cha ) creations, whohooo! 


Thank you for visiting me today.
Have a lovely Day
Ruby

Wednesday, January 3, 2018

Hello January


Hello, Welcome back to my blog and It's been a busy winter. You know how that goes and then we have CHA behind the scenes. It's a busy season but I'm glad we're past that and now I could catch up with art that I need to send out ASAP.
My first post of the year 


I really adore my character images and wanted to color this cute little girl and decided to do a little something like Valentine's theme. I almost did use her for a Christmas card theme as you could see the versatility of this image. I colored her with Copic markers and pencils on kraft paper.


At the bottom of my card added a simple clean word Hello cut form TLC Expressions
and added some pearl droplets in the center flowers.


I did a little layering with Creative Basics, Grace Build -A-Card Die kit using the different size hearts and cute little button cut.


My Design paper is nothing but lush pretty design and colors from the
Polkadoodles Time for Tea 6x6 Paper pack.


I am really loving the CAS cards these days. Also, these sentiment words cuts make the card processing so much faster.
Thank you for stopping by and I'll see you back here again soon.


Sunday, November 19, 2017

Christmas Cheer with Saturated Canary

Hello, I'm back with a Christmas scene using a Saturated Canary stamp "Parade" and some LDRS winter dies.

 It's my turn to share in the LDRS Creative Inspirational blog and this is my little Christmas cheer :)


I had a creative idea of using Parade in a scene by hand coloring a tree and whala she is now decorating her Christmas tree. The parade of animals pulling in their toys under the tree.
I watercolored my scenery with artist markers Tombow and Tim Holtz distress ink pads.
I can't get tired of coloring my SC images. Krista Smith art has always been my cup of coffee.

In case I never said it before... Love you, Krista Smith.


I used the NEW Christmas word die for my sentiment and tucked in the beautiful intricate Gilded doily die cut because it reminds me of a snowflake.
Let's not forget the Polkadoodles Winter paper pad.I couldn't pick a pattern sheet they're all so beautiful.


I tucked in the NEW Snowy Border die trim on the bottom edge. It added the nice depth to finish off my card.

I hope I gave you the inspiration to use your normal stamps and add anything winter for that perfect holiday touch. 
Add snow, a winter hat for example .... the ideas are endless. Enjoy guys :)

Have a wonderful day
Ruby


Wednesday, November 1, 2017

Believe With Thermal Weather Saturated Canary Girl

Hello peeps I'm back with a Winter theme Easel card using Saturated Canary Thermal Weather and some marvelous cuts using the NEW Christmas Holly Wreath dies and Petal Wishes Accordian Die from LDRS Creative.


I started with coloring my Saturated Canary image with Copic markers and then cut her out using the circle from Holly Wreath. I adore the stitching that the die leaves all around the circle.


I then crowned her on top of the pretty Petal Accordion fan. This Petal is so stunning I can't get enough of it and I see me playing with this again very soon.
I tucked in some Holly leaves with a pastel green color stock and the Holly wreath circle as well.


the bottom base is adorned with a Believe stamp from the Holly Days Large Circle sentiments and adorned with pretty flowers and also tucked in some cuts of Holly leaves.
My papers for this card was using the utterly beautiful Polkadoodles 6x6 paper pack Winter Land. This paper has the perfect festive color tones and designs.


Thank You for visiting me and I'll be back here very soon. 

Have a lovely Day


Thursday, September 14, 2017

Make It Crafty Buttons Halloween Fun

 Hello friends I'm back with a Halloween card featuring MIC Buttons digi with their fabulous chippies in combination of Creative Basic Dies by Rhea.
I always enjoy playing with Halloween images specially these cool MIC digis. 

I colored her with Copics and touched her up with Polychromos pencils


I wanted to layer the Fancy Rectangle Build A Card Die set cuts and wanted to use the big size as a layer instead of the card fold. I simply just cut through the stitched line and embossed line.


then just layered the both cuts


for my MIC Chipboard I colored it with my YGO6 Copic marker and added Nuvo Glow drops for dimension and glow in the dark effect.
I added a tiny bit on the dolls hair and this is what it looks like in the dark.

Lol! My corner droplets look like spooky eyes lol!


Thank you for stopping by and will be back soon.

Ruby


Wednesday, August 30, 2017

NEW Creative Basics dies by Rhea

Hello I have a double share today... I'm excited to get to play with my friend Rhea's NEWEST die collection Creative Basics Dies by Rhea. I mean she's really making it easier for us cardmakers/ Crafters with all these smart shortcuts and fun cuts to play with. 
My first card I created was an Easel card using Fancy Rectangles Build a Card Die set and Half double stitched Circles.


As you can see it's hard to see where the dies went to play and that's why I took a picture of my base. I actually ended up adding a third tab on the front of the card and that's
 where I added my "This Way"sign and I have a ghost cut in the middle tab. The back tab is to hold the actual coloring image and the back base.


I used the following stamps 

C.C. Designs Swiss Pixie Oct 31 Nora Rubber Stamp and 

C.C. Designs Swiss Pixie Dragon Hansel Rubber Stamp 


I watercolored them with Marvy markers and TimHoltz distress ink pads


DIES USED FOR THIS EASEL CARD


ALL PRODUCT LINKS ARE DOWN BELOW 

****************************************************

For my second card I created using Fancy Rectangles Build a Card Die set and Perfectly Layered Dotted Daisies


he was colored with COPIC Markers


I seriously loved playing with the flower die and giving it a awesome depth by layering different size cuts.


DIES USED FOR THIS CARD


I hope you enjoy my cards and I'll be back very soon.


Creative Basics Dotted Daisies Dies


Thursday, August 17, 2017

Teacup Full Of Wishes


Hello friends today I'm featuring Teacup full of Wishes stamp along with some LDRS Dies. 
With the combination of both I created this versatile card for many occasions.


I colored my Rubber stamp with Copic markers and cut her out with the Creative Basics Fancy Rectangle & Layers die.


I then mounted her on this intricate elegant cut using Polkadoodles Regal Frame in a mint Aqua cut and gave them dimension so they could stand on their own very nicely and set each cut apart.

My base is Time For Tea 6x6 paper pad .... I used two different sheets. One for the pop of color and the other to simply neutralize my image and my design paper and blend it all in so nicely.


I cut some hearts from Polkadoodles Dotty Doily with sparkly red paper and adorn around my image and card.

Finished it off with a silk lush red bow. The ideas for this card are endless and can be used for many occasions.
Feel free to pick her up and give her a try at the LDRS Store.
All the items used are listed for you down below and linked directly to the product.


have a sweet day and I'll see you soon 


Wednesday, August 2, 2017

I Brought The Cake


Hello I'm back with you today to share some more of the NEW Polkadoodles Time For Tea 6x6 design papers and this sweet


I colored my image with artist markers and simply fuzzy cut her out


I played with many LDRS creative dies to give dimension to my card and I used the pretty NEW Polkadoodles Time for Tea 6x6 papers... let me just say they're super super beautiful. I adore the colors and patterns. They coordinate so nicely with the images.


I have a line of dies that went into use to create my card. For my base I used Creative Basics Grace Build-a-Card Die kit. That created my white clean base with a beautiful trim circle. Then I layered all my die cuts with dimension tape.
Finished with a gold trim bow for a contrasting color. I hope I have inspired you today and get you creating. You could find the list of dies down below that went into use.
Have a wonderful day